Đặt lịch
Sửa chữa
Hotline miễn phí


iPad MINI 2 ANTENNA REPLACEMENT
Are you having an iPad Mini 2 with no Wifi at all ? This can be very irritating to work or browse the web since you use your iPad mostly on surfing internet.
Not even that, if your iPad Mini 2 is getting one of these symptoms:
Can't connect to WiFi
Low WiFi connection
No WiFi
Always disconnect
You might need to get it checked as soon as possible since there must be something wrong with your Wifi Antenna.
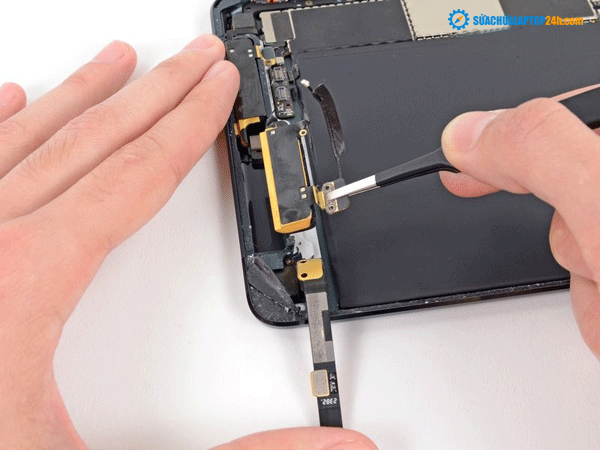
iPad Mini 2 antenna replacement at SUACHUALAPTOP24h.com
Working with your Wifi antenna means there are gonna be a lot steps which involve moving iPad pieces and screws. They are not user recommended so you better find a professional technician to help you deal with these works.
in order to replace the Wifi antenna inside iPad Mini 2, there are
Inserting the picks
Step 1: Insert the openning picks at the sides of the iPad.
The iPad mini 2’s touchscreen is glued firmly in place. To detach it, you have to constantly heat it with a heat gun so the glue will soften (see figures 1 and 2). Make sure you only heat the edge of the display. Then you have to insert a plastic pick into the gap between the frame and the display to detach the adhesive.
Step 2: Lifting the touchscreen
To get to the antenna inside the iPad we need to replace the screen first. This step requires many moves and you need to know exactly where all the parts which located near the edges and sides of the devices.
Step 3: Lifting the LCD
In order to lift the LCD screen you have to remove all the screws that hold the lcd screen in place.
Step 4: Removing the rear panel
Step 5: Disconnecting the display cables
Step 6: Disconnecting the battery connector
Step 7: Removing the right Wi-Fi antenna ( If the right antenna failed)
Step 8: Removing the left Wi-Fi antenna ( If the left antenna failed)
Step 9: Installing the left Wi-Fi antenna( If the left antenna failed)
Step 10: Installing the right Wi-Fi antenna( If the right antenna failed)
Step 11: Connecting the battery
Step 12: Attaching the rear panel
Step 13: Attaching the LCD
Step 14: Attaching the touchscreen

The reviews of customers for SUACHUALAPTOP24h.com are our motivation on work
These are all the steps the technician will have to go thought to replace the antenna in iPad Mini 2. SUACHUALAPTOP24h.com knows what should be done to get back your well functioning iPad. Let's us take care of your device, you won't never regret your decision.
Not only SUACHUALAPTOP24h.com provides iPad Mini 2 repair services, we also provide all other Apple devices services such as:
Macbook logic board repair at SUACHUALAPTOP24h.com
iPad Mini 3 Touch screen replacement at SUACHUALAPTOP24h.com
iPhone 5S broken screen replacement at SUACHUALAPTOP24h.com
Contact:
iPad MINI 2 ANTENNA REPLACEMENT
Are you having an iPad Mini 2 with no Wifi at all ? This can be very irritating to work or browse the web since you use your iPad mostly on surfing internet.
Not even that, if your iPad Mini 2 is getting one of these symptoms:
Can't connect to WiFi
Low WiFi connection
No WiFi
Always disconnect
You might need to get it checked as soon as possible since there must be something wrong with your Wifi Antenna.
iPad Mini 2 antenna replacement at SUACHUALAPTOP24h.com
Working with your Wifi antenna means there are gonna be a lot steps which involve moving iPad pieces and screws. They are not user recommended so you better find a professional technician to help you deal with these works.
in order to replace the Wifi antenna inside iPad Mini 2, there are
Inserting the picks
Step 1: Insert the openning picks at the sides of the iPad.
The iPad mini 2’s touchscreen is glued firmly in place. To detach it, you have to constantly heat it with a heat gun so the glue will soften (see figures 1 and 2). Make sure you only heat the edge of the display. Then you have to insert a plastic pick into the gap between the frame and the display to detach the adhesive.
Step 2: Lifting the touchscreen
To get to the antenna inside the iPad we need to replace the screen first. This step requires many moves and you need to know exactly where all the parts which located near the edges and sides of the devices.
Step 3: Lifting the LCD
In order to lift the LCD screen you have to remove all the screws that hold the lcd screen in place.
Step 4: Removing the rear panel
Step 5: Disconnecting the display cables
Step 6: Disconnecting the battery connector
Step 7: Removing the right Wi-Fi antenna ( If the right antenna failed)
Step 8: Removing the left Wi-Fi antenna ( If the left antenna failed)
Step 9: Installing the left Wi-Fi antenna( If the left antenna failed)
Step 10: Installing the right Wi-Fi antenna( If the right antenna failed)
Step 11: Connecting the battery
Step 12: Attaching the rear panel
Step 13: Attaching the LCD
Step 14: Attaching the touchscreen
The reviews of customers for SUACHUALAPTOP24h.com are our motivation on work
These are all the steps the technician will have to go thought to replace the antenna in iPad Mini 2. SUACHUALAPTOP24h.com knows what should be done to get back your well functioning iPad. Let's us take care of your device, you won't never regret your decision.
Not only SUACHUALAPTOP24h.com provides iPad Mini 2 repair services, we also provide all other Apple devices services such as:
Macbook logic board repair at SUACHUALAPTOP24h.com
iPad Mini 3 Touch screen replacement at SUACHUALAPTOP24h.com
iPhone 5S broken screen replacement at SUACHUALAPTOP24h.com
Contact:
Tin hot
Đặt lịch


![[Tổng hợp] 50+ hình nền đen hiện đại, chất lượng cao](https://suachualaptop24h.com/images/news/2021/03/31/small/tong-hop-50-hinh-nen-den-bao-dep-va-chat-luong_1617134787.jpg)